Posts

Showing posts with the label How Tos

January Goals Success

Image
January has been a very productive month quilting wise.  My goals were to finish the blocks for my Long Time Gone class, finish the components of Abstraction and as a bonus complete the top and to finish my Poinsettia block. These were my Longtime Gone blocks.  We needed to make the two bow tie blocks and the three blocks with flying geese.  All were completed well before the class so I was pleased.  I haven't cut out the pieces we were assigned for next month but that will come soon. The components for Abstraction went together very quickly and I was thrilled to finish the top.  The binding is also made.  A lady from my guild gave me a quilting suggestion which I rather liked.  I'm still considering the quilting.  I think this may end up waiting until I can get out to the long arm studio.  We are currently under lock down so it will be another month at least. Finally, the December block from Kathy K Wylie's workshop is now finished.  I ...
May OMG accomplishments

Image
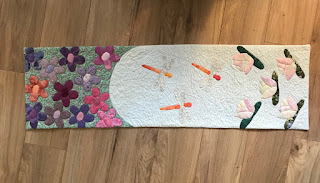
May was a good month quilt wise.  I had three things that I wanted to accomplish.  The first was my mini quilt swap project, the second was my Milkweed 3 piece and the last was a design for my Cherrywood Challenge. In January I signed up for the Canadian Quilters Association Mini Quilt swap.  I chose to swap by mail as I hadn't planned to attended the conference.  The conference has subsequently been cancelled due to the current COVID-19 pandemic and all the swaps are being done by mail.  The mailing date is June 1st.  My partner and I decided to exchange table runners rather than wall hangings.  The maximum size of wall hanging was 24" square.  I had a list of colours and shapes my partner likes and in an email conversation learned some of the designers she likes.  The starting point was dragon flies.  When I think of dragonflies I think of waterlilies so I needed a pond.  I decided my pond should have a field of flowers and my tab...

Goals 2020: Lightroom Cleanup Notes

Image
One of my goals for a long time has been to cleanup my photos in Lightroom.  I mentioned several years ago  what I am doing to keep track of progress.  The method hasn't really changed that much. I don't use the colour labels at all so I went to Metadata, Color Label Sets and picked custom.  Then picked one with a number short cut to rename.  I renamed the green label as I couldn't bear to look at a screen with too much red or yellow.  I set the name to be the actions I want to take and a reminder of how to remove the label when I'm finished.  Labels are a toggle.  Press 8 adds the label and pressing it a second time removes it. Then I went to All Photographs under Catalog and clicked on a photo and pressed Ctrl-A to select every photo in my catalog.  Once they were all selected, I pressed the number 8 which assigned my review photo label to all my photos. If I need a reminder of what my label means, clicking on the little green ...

2019 Goals: Learn Photoshop 1

Image
As I mentioned previously   a goal the last several years has to been to learn Photoshop .  I realized this year that part of my problem was I hadn't really defined what that meant so came up with a high level idea.   Through my library, I get access to Lynda.com  In January, I watched Julianne Kost's classes on Lynda.com called Photoshop CC 2019 Essential Training: Photography and The Basics .  While watching these I realized that I needed to step back a level.   I do basic editing in Lightroom, having learned some formulas but I don't understand why they work or what to do when they don't work.  I'd like to understand all the panels in the develop modules of Lightroom (or camera raw) and know how and when to use the tools.  Then when that still hasn't gotten the photo where I want it, how to continue in Photoshop .   So I stepped back and started watching her course on Camera Raw .  While its not Lightroom itself, th...

Binding Inner Corners

Image
Last weekend Karen and I went to Whirls and Swirls and quilted two of Mom's quilt tops.  One was a Judy Laquidara pattern called Note to Self and the other was a string quilt. Note to Self String Quilt  The string quilt was made to fold neatly over the corner of the bed so there are two inside corners to bind.  That's not something I had ever done before so I did some google searches, looked at several websites then took a piece of the cut off from one of the quilts, cut out a corner and grabbed a scrap of binding that was sitting on the table. Before beginning clip the corner at a 45 degree angle part way through the seam allowance.  I'm working with binding that will finish at a half inch so I clipped perhaps 3/8 of an inch.  You can see the clip open in the second photo. I forgot to get a photo of the first part when I did the trial with the scraps.  Stitch the binding along the edge leading in to the corner like usual.  When you sta...

It worked!

Image
I was looking for some applique I could take to the guild meeting the other day but the only thing I could find that was prepared was a Geisha block designed by Laurissa Werhun which has lots of glue in it. The applique is prepared by gluing under the edges then align all the pieces together and gluing the overlaps.  The prepared piece is then glued to the background When stitching this I usually have a little container of water beside the chair.  If I come across a spot that needs to be smoothed or the glue is too hard to get the needle through, I put a bit of water on a finger, hold it on the spot to soften the glue and make the necessary adjustments.  A little container of water wasn't going to work well going off to guild then I remember my waterbrush from my watercolours The handle gets filled with water and it flows out the brush as you need it.  I stopped on the way home to buy a new one as both the ones I have are stained from the watercolour pai...

Finished Top and Bias Binding Made

Image
Last night I added the borders to Friends on Chelsea Lane so the quilt top is now complete.  The fabric kit also contained the fabric for binding so this morning I prepared the binding for the quilt.  Now to figure out how I want to quilt this.  It will join the to be sandwiched pile for the next time I take down the flannel sheet and start sandwiching .    I choose to use a bias binding.  Its not really that necessary but the flowers will look nice rolling over the edge.  I started with a large square of fabric (27.5 inches) and folded it in half twice to make a small triangle The triangle gets pressed to give markings but as I worked I noticed I don't use those markings any more so I think next time I might skip the second fold.    Cut the square in half along one of the diagonals. I'm using the line I pressed as well as the 45 degree line on the roller to get my cutting line.  Once its cut in half, take the bottom rig...

Finished One!

Image
The first of two house blocks for this years $10 quilt is done.  I'm pleased with how it turned out.  There's two more little pieces to add once the paper is removed.  For the moment I'm pinning them to the block for storage since one of them is only about 1 inch square.  The Friends on Chelsea Lane spent a lot of time in my purse this week -- or pocket over the weekend.  I took three blocks to the Ladies Retreat over the weekend and during breaks and social times, stitched away.  Others were busy knitting scarves. Harvest moon.  The last star is pinned in place because I want to change the words and need to figure out what it will be so I can position the star appropriately. Friends just needs its word and some zig-zag chain stitch Bloom I've started the embroidery.  This will be this week purse project Last night, I finally quilted the little thread painting wall hanging that I started in a guild workshop in May 2009. ...