Finished Top and Bias Binding Made
Last night I added the borders to Friends on Chelsea Lane so the quilt top is now complete. The fabric kit also contained the fabric for binding so this morning I prepared the binding for the quilt. Now to figure out how I want to quilt this. It will join the to be sandwiched pile for the next time I take down the flannel sheet and start sandwiching.

I choose to use a bias binding. Its not really that necessary but the flowers will look nice rolling over the edge. I started with a large square of fabric (27.5 inches) and folded it in half twice to make a small triangle


 Cut the square in half along one of the diagonals. I'm using the line I pressed as well as the 45 degree line on the roller to get my cutting line.
 Once its cut in half, take the bottom right triangle and lay it on top of the other triangle so the bottom edge and the top edge now match. Stitch along that top edge and press the seam open.
 You are now have a trapezoid like this. The top left corner is A
 Starting in from the Top right cut from the right edge over to within a couple of inches of the left edge. The cut should be the width of the binding -- 2.5 inches here. Only this first cut goes all the way through on the right. Point B is the top Right of the first cut.


Once everything is cut, take point B and match it to point A and sew the seam. The first cut that went all the way through is outside the seam and is the start of the binding.
 Once the seam is sewn, it needs to be pressed open. If the fabric fits over the end of the sewing board, you can do that but if its too small, I use a sleeve roll from my dress make supplies to slip into the tube and stop me from pressing in creases along the cut bits.
 Press the seam open
 Then slip a small cutting mat into the tube and join the two cuts to release the binding from the tube. If necessary, draw the line and cut with scissors. It will depend on how big your tube is and what mat you have available. Make sure that the mat is in the tub so you don't cut through multiple layers of fabric at once.
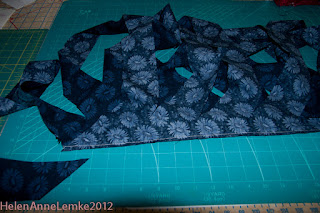
 Once its cut, fold in half and press and the binding is now ready for the quilt. This is now rolled up and will be stored with the completed top.


I choose to use a bias binding. Its not really that necessary but the flowers will look nice rolling over the edge. I started with a large square of fabric (27.5 inches) and folded it in half twice to make a small triangle


The triangle gets pressed to give markings but as I worked I noticed I don't use those markings any more so I think next time I might skip the second fold.


Keep cutting 2.5 inch widths down the fabric being careful to stop cutting a couple of inches before each side.

Once everything is cut, take point B and match it to point A and sew the seam. The first cut that went all the way through is outside the seam and is the start of the binding.


Didin't have a chance to read your blog, but I saw the finished quilt - I LOVE it. You did an amazing job on it.
ReplyDelete